1-833-300-2114

Fast fix for busted power steering lines - or any tube-hose assemblies

  • Get back on the road fast - no delays while replacement assemblies are rushed from the factory.
  • Reuse your bent tube ends with hose fittings.
  • Replace the hose at a fraction of the cost of a complete assembly.
  • You don't need to know how to weld or braze - Ferrul-Fix can be assembled without special tools or equipment when using Parker field-attachable hose fittings.

We all know how long it can take to find a replacement power steering line. Often the dealer has to order it and it can take days to get in. The aftermarket for the power steering lines can also be limited due to rare configurations of the tube part of the assembly specific to each vehicle.

The life of the power steering lines and other combination tube-hose assemblies is usually limited to the service life of the hose alone so you can use Parker Ferrul-Fix to salvage the tube part and attach it to a new hose.
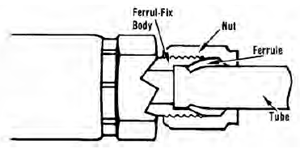
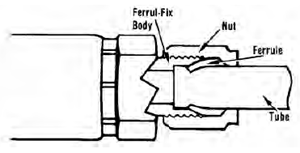
Ferrul-Fix

Ferrul-Fix consists of three parts - body, nut and ferrule. The nut pushes the ferrule from the back. The ferrule "bites" into the tube, creating a ridge and forming a seal. Another seal is between the ferrule and the fitting body. The "bite" is visible when the assembly is taken apart providing you a visual confirmation of the seal. The black finish provides "built-in" lubrication which reduces torque required for the assembly.

Ferrul-Fix Installation Instructions

  1. Cut the formed tube off squarely next to the permanent hose fitting. Lightly de-burr the end of the tube internally and externally.
  2. Disassemble the Ferrul-Fix fitting, and lubricate threads and both ends.
  3. Slide nut and ferrule onto tubing, with the long, straight end of the ferrule pointing toward the tube end.
  4. Insert tube end into the Ferrul-Fix body until it bottoms against the shoulder. Slide ferrule inside body, and screw nut down finger tight.
  5. Wrench nut down 1-3/4 turns to preset the ferrule.
  6. Disconnect nut and inspect lead edge of ferrule to make certain that the biting edge has turned up a shoulder to a height of at least 50% of the ferrule and completely around the tube.
  7. Assemble Ferrul-Fix fitting to hose. Refer to assembly instructions listed in the appropriate fittings section. Do not assemble to hose before steps 1-6.
  8. Reassemble tubing into Ferrul-Fix end and turn nut down easily until a sudden increase in force is evident. Turn bent tube to proper position if required. Using two wrenches, one on the fitting nipple hex and the other on the nut, tighten nut an additional 1/6 turn (one wrench flat).

Parker Ferrule-Fix installation - step 1

Parker Ferrule-Fix installation - step 2

Parker Ferrule-Fix installation - step 3

Parker Ferrule-Fix installation - step 4

Parker Ferrule-Fix installation - step 5

 Posted by Marek Bobik


Related Articles
Eliminate costly hydraulic leaks - Use Parker Seal-Lok™ fittings

Eliminate costly hydraulic leaks - Use Parker...

Using O-ring face seal fittings (ORFS or flat face fittings) such as Parker Seal-Lok is one of the...
Read More
Use Parker Tracking System Tags to Help Your Social Distancing

Use Parker Tracking System Tags to Help Your...

We wrote about the advantages of the Parker Tracking System (PTS) back in August of 2013. One of...
Read More
Uptime is Everything | Track Your Hose Assemblies - Save Time

Uptime is Everything | Track Your Hose Assemblies...

The Technology The new Parker Tracking System (PTS) makes it fast and easy to replace hose...
Read More
Parker Tracking System at Work

Parker Tracking System at Work

July 8, 2010 - ThyssenKrupp AG (Reno, Nev.) added the Parker Tracking System (PTS) to its annual...
Read More